Common Mistakes Contractors Make While Installing Polycarbonate Sheets
Wrong side up. Screws over-tightened. No expansion gaps. These are the most common polycarbonate installation mistakes — and every one of them is avoidable with the right knowledge.
Polycarbonate installation has a deceptive simplicity to it. The panels are light, the connectors click together, and a crew that's fast with metal roofing often assumes the same instincts apply. They don't. The failure modes are different, the tolerances matter more, and several of the most common mistakes are invisible until the next monsoon.
Here are the mistakes that appear most frequently — and exactly how to avoid each one.
Mistake 1: Over-Tightening Screws
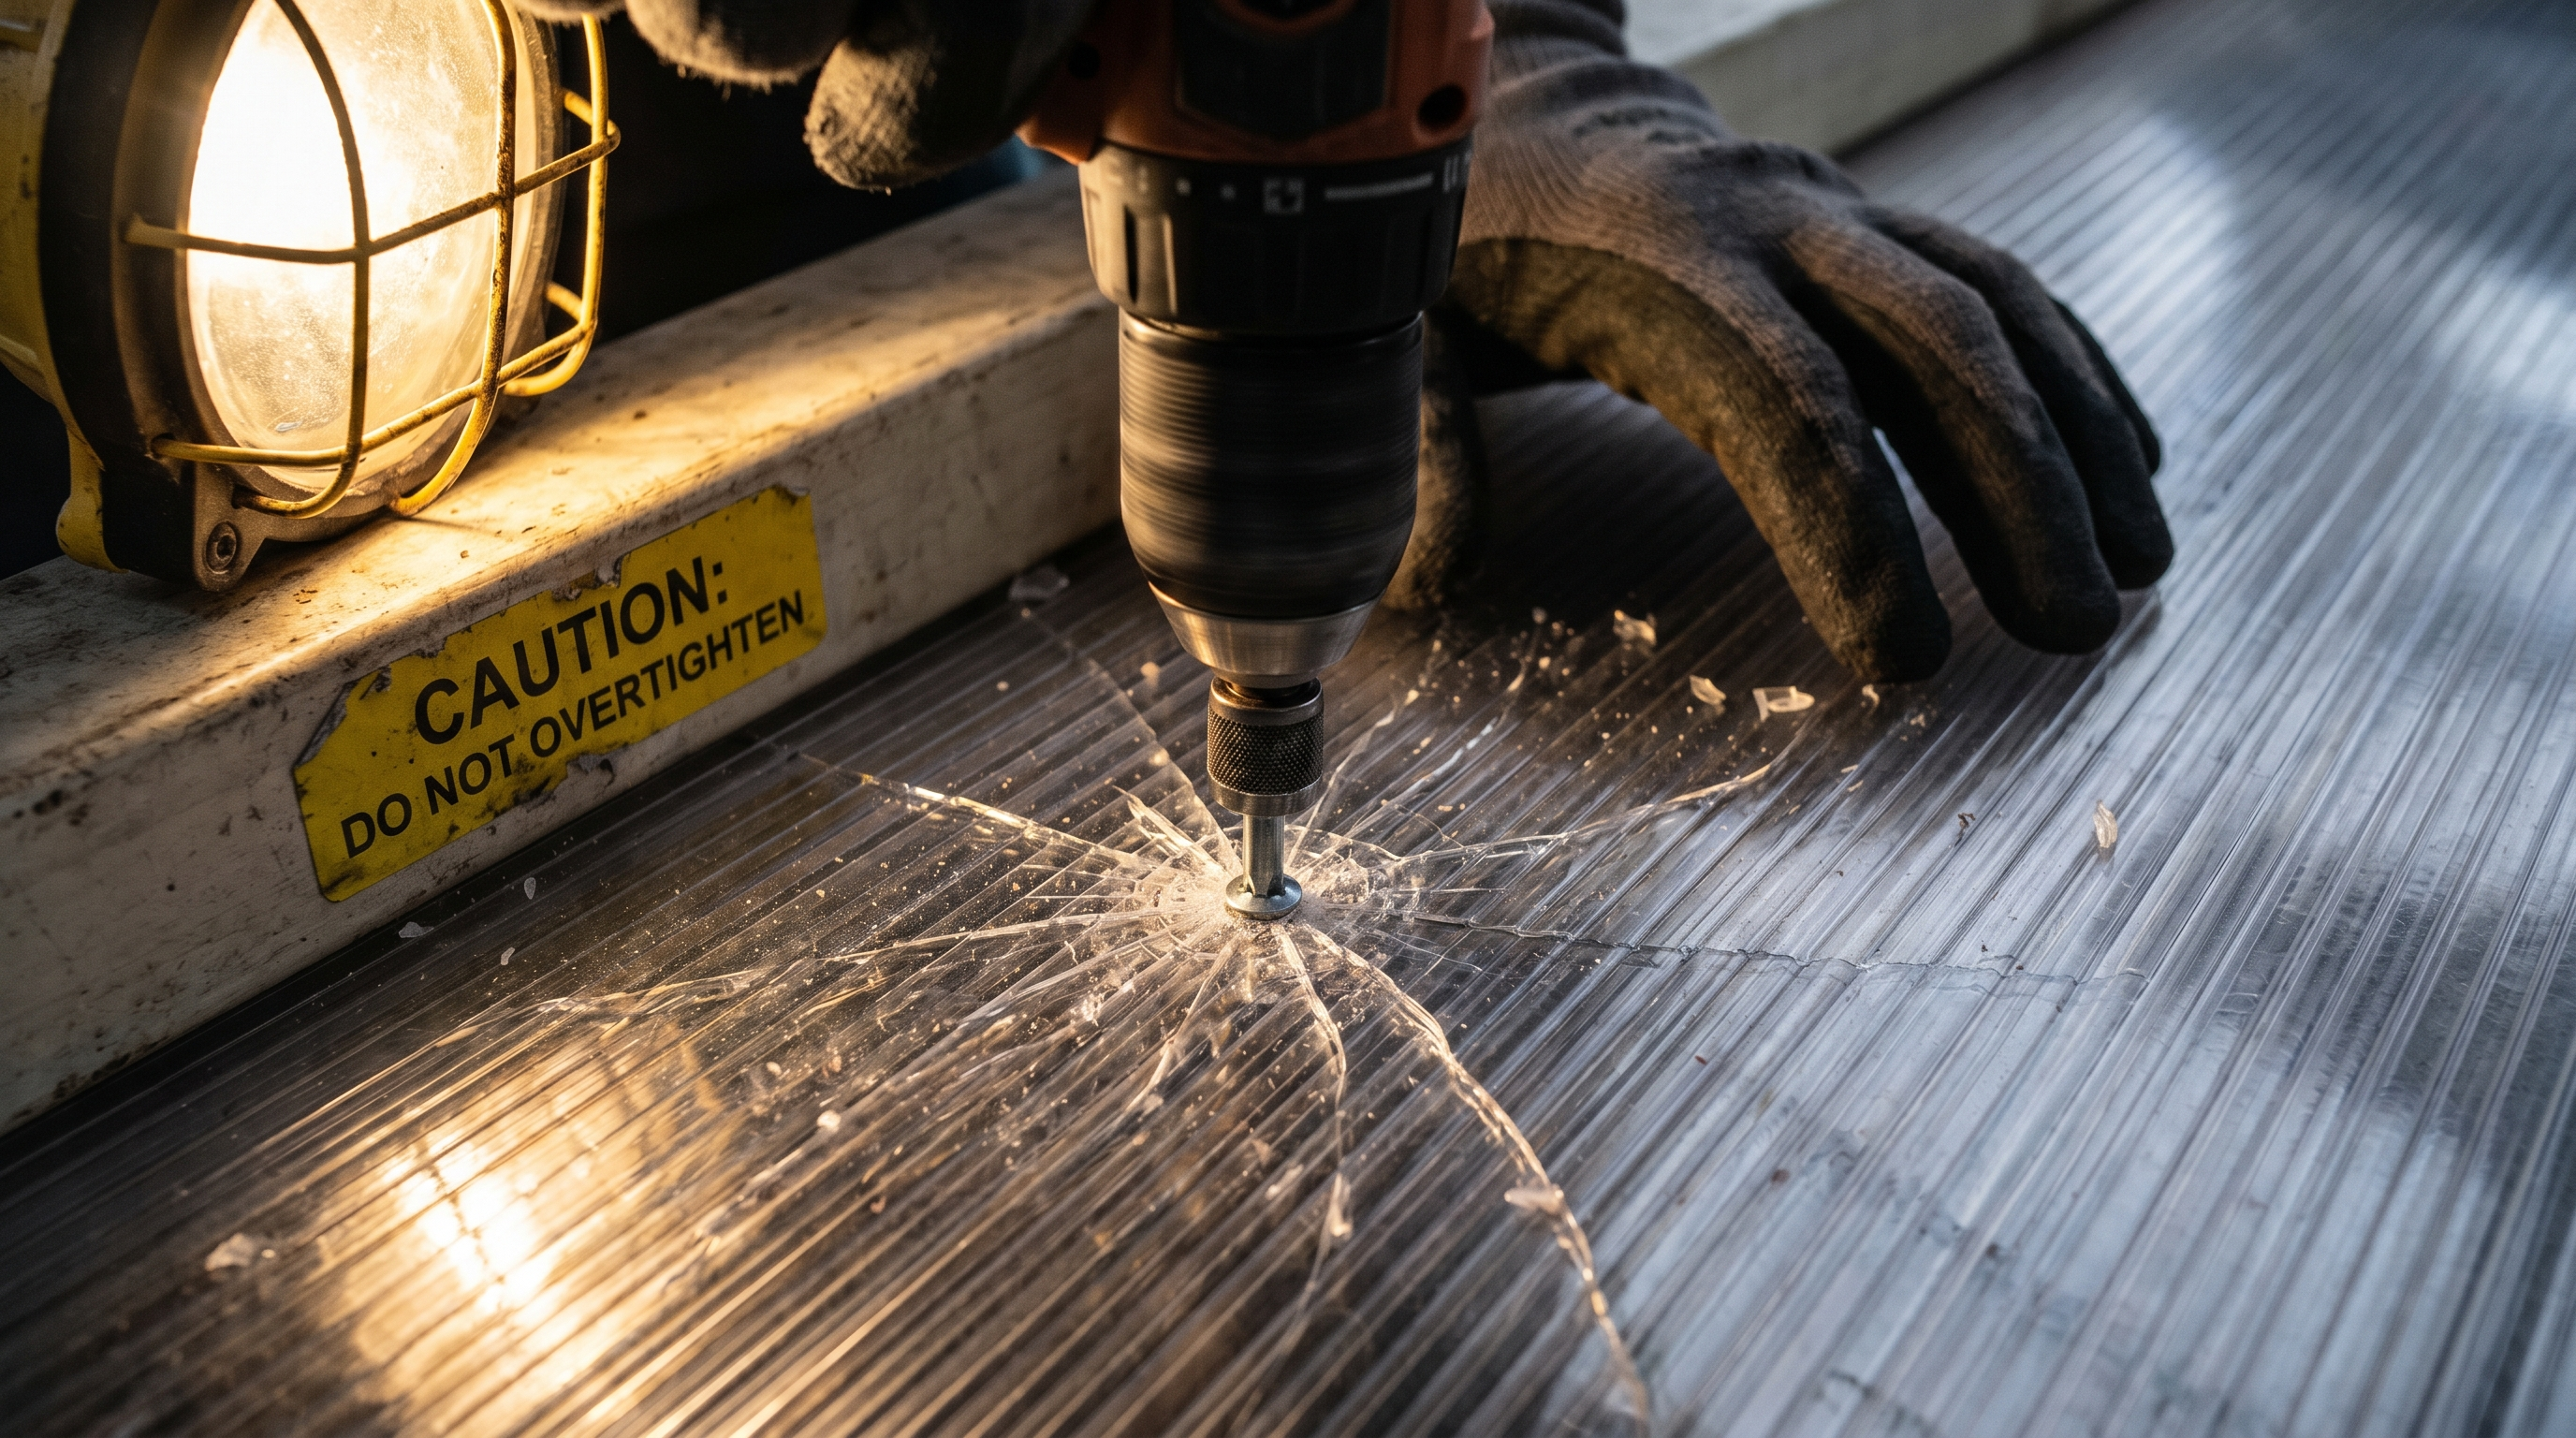
This is the single most common cause of cracked panels and leaks on face-fixed polycarbonate installations.
Polycarbonate is not steel. It expands and contracts significantly with temperature change. A screw that is driven tight against the panel creates a fixed point that resists thermal movement. When the panel expands, it has nowhere to go except against the fastener — and the result is a radial stress crack around every over-tightened hole.
The rule: Use an oversized hole (typically 2–3mm larger than the fastener diameter for thermal movement) and tighten only until the sealing washer just contacts the panel surface. Never use a drill driver at full torque. If you see the panel dimpling around the fastener — you're already too tight.
For standing seam systems that fix through the cleat rather than the panel face, this mistake doesn't apply — but make sure your crew understands which system they're installing before they start.
Mistake 2: Wrong Side Up
Every polycarbonate panel with UV protection has a correct top side and a correct bottom side. The top (sun-exposed) face has the heavier co-extruded UV layer — 45–50 microns. The bottom has a lighter layer — 15–25 microns.
Installing a panel upside down means the weaker UV layer faces the sun. Degradation begins immediately. The panel will yellow faster, impact resistance will drop sooner, and the warranty is void.
How to tell which side is up: the protective film on every panel is marked with the manufacturer's name and a direction arrow or "UV protection this side" text. This is the side that faces the sky.
The rule: Brief your crew explicitly. Check the first ten panels of every job. Remove the film only after installation and only from the correct side first.
Mistake 3: Ignoring Thermal Expansion Gaps
Polycarbonate expands at approximately 0.065 mm per metre per degree Celsius. In a northern Indian climate where a roof can see a temperature differential of 60–70°C between winter night and summer midday, a 6-metre panel can move approximately 23–25mm along its length over a full year.
The most common manifestation of this mistake is panels that buckle or bow after the first summer, or end closures that crack because the panel has expanded into a rigid aluminium U-profile with no movement allowance.
The rule:
- Leave a minimum 3–5mm gap between the panel end and the stop in the U-profile
- For long panels (over 4m), confirm the manufacturer's recommended end clearance
- Never press panels tightly against ridge flashings or wall flashings — leave sealant-filled movement gaps
- On curved or hipped roofs, the combined thermal movement across multiple panels can be significant — design flashings with adequate lap lengths to accommodate movement
Mistake 4: Wrong Screw Spacing
On face-fixed systems, screws that are spaced too far apart leave unsupported panel face area between fixings, which increases wind uplift risk and can cause visible undulation (oil canning) between fixings.
Screws too close together add unnecessary penetrations, each a potential leak point, and increase the risk of stress cracking between adjacent holes.
The rule: Follow the manufacturer's fixing layout drawing. For most systems this is 300–500mm spacing along the purlin line. Never improvise spacing based on what "looks right." If you don't have a fixing layout drawing, ask for one before you start.
Mistake 5: Unsupported Spans
Installing panels at purlin spacings that exceed the system's rated span is a structural and warranty issue. A panel at 1,400mm span when it's rated for 1,200mm will deflect more, oil-can more visibly, and may fail under design wind loads.
This mistake usually originates in the structural phase — a client or contractor adjusts purlin spacing to save steel — and surfaces during polycarbonate installation when someone notices the panels "bounce" between purlins.
The rule: Verify actual purlin spacing on site before installation begins. If the structure does not match the approved drawings, do not proceed. Issue a non-conformance note and get written confirmation of the variation before installing panels to an unsupported span.
Mistake 6: Missing End Sealing
The open cells at every panel end are an entry point for three things: water, dust, and insects. Unsealed ends cause internal contamination that is visible through the panel surface — dark lines or dirty stripes that cannot be cleaned.
Beyond aesthetics, unsealed ends allow capillary water ingress, particularly with wind-driven rain. In multiwall panels, water trapped inside the cells cannot evaporate and creates persistent damp conditions that accelerate UV degradation from the inside.
The rule: Before fitting the aluminium U-profile on every panel end, apply aluminium tape across the full cell width. The tape must cover all open cells fully — no gaps. Press it firmly. Then fit the U-profile and PC end caps over the taped end. This sequence should be non-negotiable on every job.
Mistake 7: Poor Flashing Details
The most common flashing mistake is cutting corners at wall abutments and ridge conditions — using sealant only, or relying on a single lap without mechanical fixing.
Polycarbonate roofs experience more thermal movement than metal roofs. A flashing that is only sealant-bonded will crack at the sealant joint within 2–3 monsoon seasons. A flashing that is too short at the lap will allow wind-driven rain to get behind it at the exact moment uplift pressure is highest.
The rule:
- Ridge flashings must lap at least 100mm over the panel end U-profile
- Wall abutment flashings must have a kick-out profile at the bottom to direct water away from the wall cavity
- All flashings must be mechanically fixed (not just sealant-bonded) with allowance for thermal movement
- Use a compatible flexible sealant at movement joints — not a rigid epoxy
Mistake 8: Removing Protective Film Too Early
Protective film on polycarbonate panels has one job: protect the surface during transport, handling, and installation. Once the film is removed, the surface is exposed and cannot be protected again.
The mistake is removing film in advance to "make installation easier" — and then having the exposed surface scratched by cleats, boots, tools, or abrasive dust during the rest of the installation.
The rule: Remove film only after all work in that area is complete. Work from one end of the roof to the other, removing film as you complete each section. Never walk on an unprotected panel surface.
Coxwell provides site training for contractor teams installing Coxwell systems. If your crew is new to standing seam polycarbonate, contact us to arrange a pre-installation briefing.
Next step
Speak to a Coxwell engineer.
Our team can help you specify the right system, review your BOQ, or answer technical questions about your project.